Facebook doesn't make it easy to find the link to deactivate your Facebook account, but deactivating Facebook can be accomplished fairly easily once you know where to look.
First, though, be clear about whether you want to suspend or delete your Facebook account. Facebook calls a temporary account suspension deactivating and permanent cancellation deleting. There's a world of difference between deactivating and deleting.
Deactivating just suspends your account until you sign back in. Your profile and data will be invisible to others until you reactivate your account, but Facebook saves it all in case you want to return. Deleting, by contrast, permanently erases your account (though it takes two weeks to make that happen).
Before you start either process, be sure to remove any linked accounts you may have to other websites or accounts that use Facebook Connect. That's so you don't get logged into Facebook automatically and accidentally undo your Facebook deactivation.
Okay, let's get started deactivating your Facebook account.
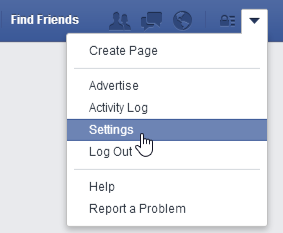
Go to Account Settings, Find Deactivate My Account
Facebook
To find the link to deactivate your Facebook, sign in and go to the menu at the top of every page. Click Settings and scroll down to the bottom. (Yes, Facebook likes to hide its deactivation link.)
Click Deactivate to the far right at the bottom.
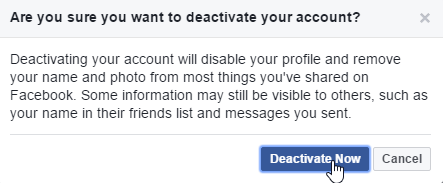
It will ask, "Are you sure you want to deactivate your account? Deactivating your account will disable your profile and remove your name and picture from anything you've shared on Facebook."
Then it may pick a friend of yours and say "So-and-So will miss you." Facebook will even display his or her photo, in an attempt to make you feel warm and fuzzy about the service you are trying to leave. It may even tell you how many friends you stand to lose.
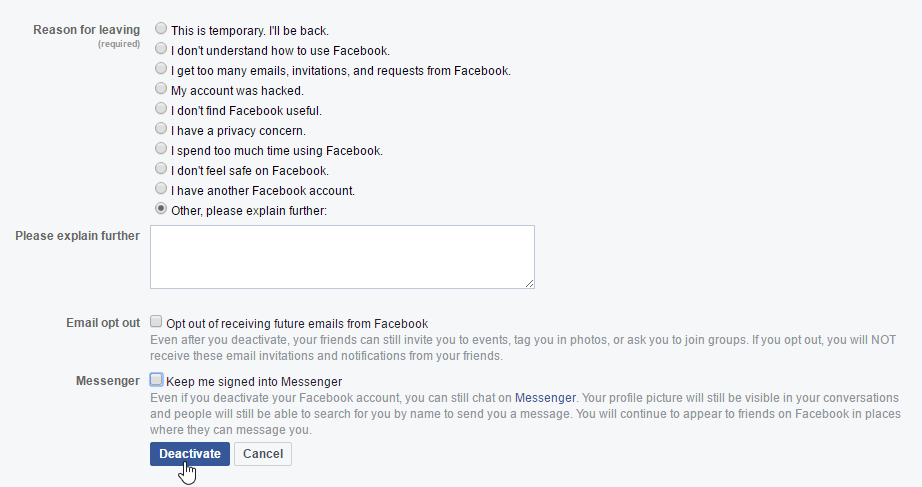
You must answer two more questions before you can click the button to deactivate.
Choose Your Reason for Deactivating Facebook
Facebook
Next, it will require you to check a reason for leaving Facebook before the network will allow you to deactivate your Facebook account.
Your options include worries about privacy, having your account hacked, not finding Facebook useful, not understanding how to use Facebook and "I spend too much time using Facebook."
There are so many reasons people leave Facebook, you may have trouble deciding which matters most to you. But check one and move on.
Opt Out of Emails From Facebook
Facebook
Finally, it will present a box you must check if you want to Opt out of receiving future emails from Facebook.
Be sure to check this if you want to stop getting invites from your Facebook friends. If you don't check this, your friends can continue tagging you in photos even after you've deactivated your Facebook.
Click to Deactivate Facebook
Finally, click the Confirm button to deactivate your account.
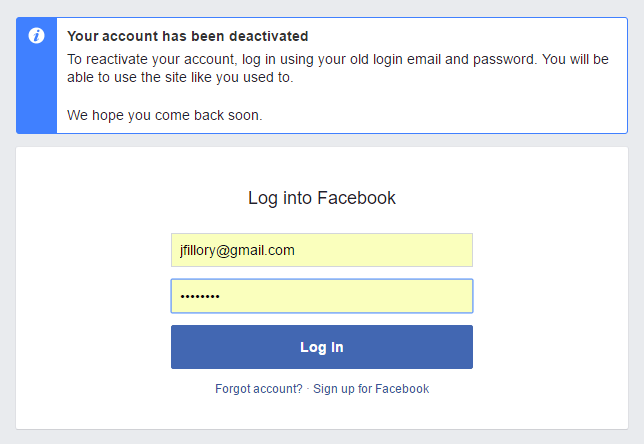
But remember, you haven't deleted your account. It is merely suspended from viewing, so to speak.
Facebook's FAQ pages explain that your profile and the info linked to it disappear from viewing, so your profile is no longer searchable and your friends no longer see your Wall.
However, all that information gets saved by Facebook, including your friends, photo albums, and any groups you joined. Facebook says it does this in case you change your mind and want to use Facebook again in the future.
"A lot of people deactivate their accounts for temporary reasons and expect their profiles to be there when they return to the service," says the Facebook help page on deactivation.
Reactivate Your Facebook Account
If you change your mind later, you can easily retrieve your account. This article explains how to reactivate your Facebook account.
How to Permanently Delete Your Facebook
If you really want to quit Facebook, there is a way of making a permanent exit.
This method permanently wipes out your profile information and Facebook history, so you can't reactivate your Facebook account later.
It takes about 14 days to permanently delete your Facebook account, but it's not hard to do.
Click on the confirm button and your account deletion will begin. Delete Facebook Account Link
This is official link for deleting facebook account is https://www.facebook.com/help/delete_account Delete Facebook Account Now
If you want your facebook account to be deleted right now. Like instantly, here is where you should go – https://www.facebook.com/help/delete_account Delete Facebook Account Forever
I’m sure you have caught up with this by now. But if you haven’t, here is what’s up. This link (https://www.facebook.com/help/delete_account) is the answer to almost all your delete facebook problems.
Just click here and delete your facebook account now.
updated post on How To Deactivate Facebook Account On Mobile
*Click the account menu at the top right of any Facebook page
*Select Settings
*Click Security in the left column
*Choose Deactivate your account then follow the steps to confirm
If you deactivate your account your profile won’t be visible to other people on Facebook and people won’t be able to search for you. Some information, such as messages you sent to friends, may still be visible to others.
Or
Visit: www.facebook.com/deactivate.php on your web browser.
If you’d like to resume with your Facebook anytime after you’ve deactivated your FB account, you can reactivate your account simply by logging in with your email and password.
Your complete profile will be restored in its entirety for example: friends, photos and interests.
Remember that you’ll need to have access to the login email address for your account to reactivate it. If you can’t get into your account, you can reset your password.
How to permanently delete your FB account
If you delete your Facebook permanently, you won’t be able to reactivate or retrieve any of the data or information you had on Facebook. If you’d like to permanently delete your account with no option for recovery click here: How to Delete Facebook Permanently
Did it work? Were you able to deactivate your Facebook account? If not, tell us what the problem is – in the comment box below.
If you decide that you no longer want to use Facebook, it's easy to deactivate your account. When you deactivate your account, you're hidingall of your information on Facebook. No one will be able to contact you on Facebook or view the things you've shared, including your Timeline, status updates, photos, and so on. If you decide that you'd like to return to Facebook, you'll still be able to reactivate your account and recover your old information.
To deactivate your account:
Click the drop-down arrow on the toolbar, then select Settings.
The settings page will appear. Select General > Manage Account, then click Deactivate.
Select a reason for deactivating the account. If you want, you can add more details in the text box below. When you're done, click Deactivate.
Select Deactivate Now.
Your account is now deactivated. You'll have the option to reactivate your account at any time by signing in to Facebook with your old account information.
Deleting your Facebook account
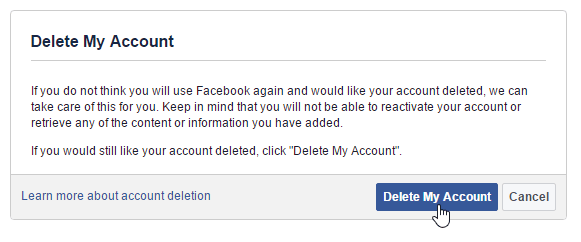
Deactivating your account does not fully deleteit. When you deactivate your account, Facebook saves all of your settings, photos, and information in case you decide to reactivate your account. Your information isn't gone—it's just hidden. However, it is possible to deleteyour accountpermanently with no option for recovery.
You should only do this if you are absolutelysure you want to permanently delete your Facebook account.
To delete your Facebook account, follow this link to the Delete My Account page. Sign in to Facebook, then click Delete My Account.
In the wake of Facebook's massive mishandling of user data, you may be inclined to delete your entire account's existence off the social network. We're not going to judge.
Facebook previously revealed up to 87 million Facebook users had their data improperly accessed. Cambridge Analytica harvested information belonging to millions of Facebook users to determine and influence how they may vote at the ballot box during US President Donald Trump's election campaign. The scandal has rocked Facebook's stock price and its trust with users.
Deleting vs deactivating: What's the difference?
Facebook allows users to delete or deactivate their account.
Deleting your Facebook account
Deleting a Facebook account removes it from public view on the social network, alongside anything you've ever posted or uploaded to its servers.
Since some things like messages aren't stored on your account, your friends may still be able to see them. When you delete your Facebook account, you can't regain access once it's completely deleted by Facebook.
Facebook is on the internet, so it's important to remember some things just can't be deleted forever.
Deactivating your Facebook account
Deactivating a Facebook account enables users to hide their timeline, profile, and posts out of public view. You can reactivate whenever you want. Of course, some content like messages may still be visible by friends.
How to delete your Facebook account
Login to Facebook.com with your username and password
Confirm to Facebook you want to delete your account and data
To delete your Facebook account, you have to submit a form to Facebook.
From there, you'll acknowledge that Facebook is deleting your account on your behalf, and you will not be able to reactivate your account. Before deleting your account, be sure to download your Facebook information through a tool on the social network.
Here's how to delete your Facebook account. (Screenshot: Jake Smith/ZDNet)
Facebook says it can take up to 90 days from the beginning of the deletion process to delete all of the things you've posted, including photos, status updates, or other data stored in backup systems. While Facebook is deleting your account information, it is inaccessible to other people using Facebook. If you have linked Facebook apps, they will also be permanently deleted.
How to deactivate your Facebook account
To deactivate your Facebook account, go to Facebook's settings menu, and then select Manage Account. From there, you'll tap Deactivate next to account.
Facebook offers privacy settings to control more of your data. (File photo)
When your Facebook account is deactivated:
No one else can see your profile.
Some information, like messages you sent to friends, may still be visible.
Your friends may still see your name in their friends list. This is only visible to your friends, and only from their friends list.
Group admins may still be able to see your posts and comments, along with your name.
Since a lot of information is still public, you should only deactivate your Facebook account if it's a temporary break from the social network, or if you're unsure.
You can still have Messenger with a deactivated account
You can still chat with friends on Messenger, and your Facebook profile picture will still be visible in your conversations on Messenger. Other people can search for you to send you a message, as well.
How to deactivate Facebook Messenger
You can only deactivate Messenger if you previously deactivated your Facebook account.
To deactivate it, open Messenger, then tap your profile picture in the top left corner, and go to Privacy & Terms > Deactivate Messenger. From there, enter your password and tap Continue. Next, tap Deactivate.
To reactivate your Facebook account, you'll need to have access to the email or mobile number you use to log in to complete the reactivation.
So, what's next?
Facebook CEO Mark Zuckerberg went to Capital Hill to answer lawmakers' questions on the misuse of data. Facebook has repeatedly apologized for the mishap, and it's promising stronger and more transparent user privacy and data settings going forward.
Have you had enough of Facebook? And if so, what was it that finally tipped you over the edge? Was it the Cambridge Analytica scandal? Perhaps you’ve just seen one too many pouting selfies in your feed. Or the endless quizzes finally pushed you to leave.
Regardless of what got you to this point, you need to know how to delete your account and what happens to your data once you take that final step.
Delete or deactivate
First up: delete or deactivate? You have a choice. You can take a short break from facebook by deactivating your account, rather than the final step of deleting it.
If you deactivate your account, it disables your profile and removes your name and photos from most things you’ve shared. However, all that data sits there, waiting for you to log back into your account, and once you do, all your links and friendships are active once more.
To deactivate your account, go to Settings> Manage account. Scroll down to deactivate account.
Perhaps deactivating isn’t far enough, and you want to leave Facebook permanently. That leaves you with the nuclear option.
Click on Settings> your Facebook information and select Delete Your Account and Information. Click Delete My Account.
But it’s not that simple. Your account and information won’t disappear immediately from the site. In fact, the process only starts 14 days after you click that delete button, with your account deactivated in the meantime. So any time during that 14 days, you can log in and change your mind.
Add to that the fact that it can take up to 90 days to get everything deleted from back up systems and so on.
Once you delete your account, you can’t reactivate it. All your photos, videos and status updates you put on the site will go. Some messages might linger on friends’ accounts, but that’s it really.
Warning
But before you click that delete button, have a think about what accounts you have linked to Facebook. If you used your Facebook account to sign up services such as , deleting the account could lose your access to those serbvcies too.
Check out what services have access to your Facebook account by going to Settings>Apps and websites.
Did you know Facebook allows you to temporarily deactivate your account? This allows you to stop others from viewing your profile and content, without actually deleting any of your information. If you ever want to come back to Facebook later on, you can reactivate your account by logging into Facebook with your email address and password.
Our guide will show you how to deactivate your account from within the Facebook mobile application.
Note: These screenshots were captured in the Facebook app on iOS. Also note, when you deactivate your Facebook account, you can still chat with friends on Messenger.
Step 1: Tap the three lines in the bottom-right corner of the screen.
Step 2: Scroll down and tap “Setting & Privacy.”
Step 3: Tap “Account Settings.”
Step 4: Tap “General.”
Step 5: Tap “Manage Account.”
Step 6: Tap “Deactivate.” You may be asked to enter your password after doing so.
Step 7: Scroll down and tap the circle to the left of the option that best describes why you want to deactivate your account. You can tap the circle next to “Other, please explain further:” if you want to enter your own reason.
Important Note: If you select “This is temporary. I’ll be back.” Facebook will set your account to automatically reactivate after seven days. This setting can be customized to anywhere between one and seven days, but you can’t stop the reactivation from happening. If you don’t want your account to automatically reactivate, you’ll need to select a different choice for why you’re deactivating your account.
Step 8 (optional): Depending on your choice, a window may appear describing how you can address the issue without deactivating your account. If you want to continue with the deactivation process, tap “Close.”
Step 9 (optional): When you deactivate your account, you may still receive emails from Facebook related to things like event invitations and photos you’ve been tagged in. Tap the box to the left of “Opt out of receiving future emails from Facebook” to prevent Facebook from sending these emails.
Step 10: Scroll down to the bottom of the screen and tap “Deactivate.” This will log you out of the Facebook app and deactivate your account.
You probably have noticed that Facebook Live poll videos are the hottest trend right now; you could say that they have swept through the social media marketing community like a tidal wave. I know that many marketers would love to try this new format on their pages but don’t know how to create it.
You might already have seen a bunch of complicated tutorials on the internet that perhaps pushed you off from even trying. But no need to despair! In this article, I will show you how to create a Facebook Live poll video in just about 15 minutes without any programming skills or special technical knowledge.
LATEST UPDATE Dear friends, the service I mention in this article doesn’t work anymore. I recommend you to useGoUpLIVE instead. It is even easier to use and they have more interesting interactive video templates. On top of that, they stream your live polls from their servers, so you don’t need to do it from your computer anymore.
If you would like to learn more about the templates offered by UpLIVE.
A short introduction for those of you, who haven’t heard about Facebook Live polls before.
Basically, Facebook Live poll is a simple video consisting of the following elements: 1) a question, 2) two or four images representing answer options, 3) the reactions a user is supposed to use and 4) vote counters that are updated in real time.
This is the Live poll from where it all started: Clinton vs Trump. It got more than 19 million views, 437,000+ reactions and more than 15,000 shares.
Why are Facebook Live poll videos more efficient than normal page posts?
The answer to this question is very simple. There are at least two reasons for that:
First of all, Facebook tends to push Live videos higher in the Newsfeed. Live videos get an extra organic boost from the algorithm while they are live. After that, a live video is treated as a normal video post which also gets a good organic reach. In case you didn’t know, Facebook spent hundreds of millions of dollars to promote Live events. So, it goes without saying, that Facebook is right now trying to encourage people to use this feature.
Secondly, Facebook live polls are a new cool feature and people love all things shiny and new. Live polls stand out in people’s feeds and attract more attention. For this reason, now is the best time to jump on the live poll train. You want to be one of the first ones, rather than last, to use this new feature. This way you get the best results.
How to create a Facebook Live poll video in 5 easy steps
UPDATE: Hey guys! I have recently found a new cool tool called UpLive. They have some unique Facebook LIVE video templates that I haven’t seen any other services offering. I personally love their Reveal template as it works just great. If you are interested, check them out. I also have a new article with in-depth description of all their templates and how you can use them to promote your Facebook page.
Happy LIVE polling!
— Ekaterina Frolova
In this tutorial we will create a quick and easy live poll with the help of a service called Video React. Note: this isn’t a free service but it is definitely worth every cent. It will save you a lot of precious time and, most importantly, your nerves.
I have already created several Facebook Live polls with Video React and I absolutely love it. It took me literally some 15 minutes to create my first poll and even less for the next ones. You don’t have to deal with any HTML-templates. You won’t even need to create a Live event on Facebook; Video React will do the whole job for you.
You will be able to create four types of Facebook live polls with the help of Video React:
a poll with two photos (for example, cats vs dogs) and reactions and
a poll with one photo and the same two reactions ( & ). You might want to use this one if you want to create your own image with special fonts or your branding. I use Canva to create an image for this type of poll.
a poll with four photos and four different reactions.
NEW FEATURE: a poll with a question and four horizontal lines where the amount of votes is displayed. I really love this poll type. I have seen one major Facebook page using a poll like this to compare footballers (the European kind ). I think this template is great for encouraging audience to vote for their favourite celebrities, foods, drinks, flavours, clothing items and so on.
You can see each type displayed in the picture below.
In a nutshell, all you need to do is follow these five steps:
sign up for Video React;
download a free software for broadcasts called OBS Studio (works with Windows OS, Mac OS and Linux OS);
in Video React, create your Facebook Live poll post (upload your images and write the post text);
copy and paste the key and link (generated for you in Video React) into the OBS Studio software;
click the «Start streaming» button.
That’s it! It’s that simple! No programming or technical knowledge needed!
Step-by-step tutorial: how to create a Facebook Live poll
1. Sign up for Video React.
Go to Video React’s website.
Click on the red button «Create Facebook Live Voting».
A pop up window will appear and ask you to sign in. Sign in to your personal Facebook profile and click on «Continue as [your name].»
Give the application permission to have access to your Facebook pages and to post on them.Click «OK». Don’t switch off any of the permissions because otherwise the app won’t be able to do the job for you. It needs access to your pages and the permission to post since it will actually post your Live poll to your page in one click.
2. Create your Facebook Live Poll post
In this step we will work on the Facebook post that your audience will see.
First, from the dropdown list, select the page on which your poll will be posted.
Next, choose the poll format you want to use: 1 or 2 images with two Facebook reactions or 4 photos with four different reactions.
If you decided to use the 2 photos option, add a title to each photo. Also, you can choose either «or» or «vs». This will be displayed between titles.
If you wish, you can add a color background (optional) that will appear behind the two photos.
Upload the photos.
Select the Facebook reactions that you would like to use in your poll. These are trackable reactions and their count will be displayed on the video in real time.
And finally, write your post caption. Remember to include the question you want to ask your audience; they should have a clear call-to-action to act upon. Don’t make the caption too long. This will only distract your audience from the poll.
Save your poll post to continue.
Click to enlarge the image.
3. Choose your payment plan
When you click on the «Save» button, you will be asked to choose a payment plan.
You have two options here:
a one month subscription for unlimited polls for unlimited Facebook pages;
or a life time subscription for unlimited polls for unlimited Facebook pages.
For the time being you can only pay with PayPal. However, I believe that there will be more payment options in the future.
Once you have paid for the service, you will get back to the post design page. Click on the «Save» button once again.
4. Automatically generate «Stream Key» and «Stream URL»
Now we have come to an important step. Video React will automatically generate a «Stream Key» and «Stream URL» for you. You will need to enter the key and the URL into the OBS Studio software. I will show you how to do it in the following steps.
IMPORTANT! Keep the Stream Key a secret. Anyone who gets access to your key will be able to stream video to your post. The stream key is valid for 7 days.
Open a new browser tab. Download and install OBS Studio. OBS Studio is a free open source software for video recording and live streaming. We need it in order to be able to show the reactions vote count in real time in our Facebook Live video.
Now, let’s set up your streaming software. It is very easy to do, just follow my step-by-step instructions below and you will be set for success
1. Open the program. 2. Go to the program «Preferences», then choose the «Stream» tab as shown on the screenshot below. Then, choose «Facebook Live» in the field called «Stream».
3. Go to your Video React tab. There you should see a field called «Stream key». Copy the key and paste it into OBS Studio, in the field (that also is) named «Stream key».
4. Next, in OBS Studio, go to the «Video» tab and set the video resolution to 768×768. Do it in both fields: «Base Resolution» and «Output Resolution». Save the changes by clicking «OK».
IMPORTANT! Type in the resolution numbers manually, don’t copy and paste. When I first tried to copy/paste the numbers, my computer couldn’t save them. This resulted in an incorrect video output, so, please, pay attention to this step.
5. Now, go to the «Audio» tab and make sure that you have totally disabled all the audio output. See the example below. Save the changes by clicking «OK».
6. In the section called «Scenes», create a new scene by pressing «+» (see picture below, lower left corner). Give your scene a name, for example, the name of your poll. It doesn’t really matter what name you give. You can leave the default name, if you wish. Press «OK» to save the changes.
7. In the section called «Sources», click on the «+» (see picture below)and select the option «BrowserSource». Give the source a name or just leave the default name. Press «OK» to save the changes.
8. In the pop-up window (see picture below), delete the link in the URL field. Go back to your Video React tab. There you should see a field called «Stream URL». Copy the key and paste it into OBS Studio, in the field (that also is) named «Stream URL».
Next, in the fields «Width» and «High» enter the resolution 768 and 768; otherwise the picture will not be displayed correctly. Save the changes by clicking on the button «OK».
9. Well done! We are almost there and ready to launch our first Facebook Live video poll.
Before you post your poll, please check that your video is being displayed correctly. Look at the example below. Your image should be surrounded by a grey area. Only the area inside of the red lines will be visible to Facebook users. If you happen to see a black area around your video image, go back to the steps #4 and #5/4 in this section and make sure that the video resolution is set to 768 x 768.
8. If everything is fine and you are ready to go, press the button «Start Streaming».
IMPORTANT! When you press on «Start Streaming», your Live poll will be automatically published on your Facebook page.
What you should do when your Facebook Live poll video is streaming
Once you have pushed your video live, monitor that everything goes according to plan.
The most important thing is that you keep your OBS Studio window open during the whole streaming time! This is crucial because your audience will see what is displayed in this window. If your computer freezes or shuts down, your streaming will go offline.
How to increase the reach of your Facebook Live poll?
Here are some simple recommendations for you:
Pin your Facebook live poll to the top of your page to gain as much exposure as possible.
Share the poll on your personal timeline to give the post the first boost. If you have colleagues, partners or employees, ask them to share the post as well.
Share the poll in relevant Facebook groups to further increase the reach.
Embed the live streaming poll to your website or blog.
If you have newsletter subscribers, send them an email with a kind invitation to vote. Remember to include the link to your poll I highly recommend to prepare the newsletter in advance — Facebook allows maximum 4 hours of streaming.
Promote the link to your live poll on other social media channels.
Things to keep in mind before you start your Facebook Live poll
In order to run a Facebook Live streaming event, you need a high speed internet connection and a good computer! If your internet is turned off or your computer freezes, your live poll will go offline as well.
The maximum duration of the live video on Facebook is 4 hours. Make sure that you can be around your computer all this time.
OBS Studio must be open during the entire streaming time. You can use your computer, but do not close the streaming window.
You can run one streaming at a time. This means that you cannot run simultaneously two or more live polls on the same computer.

:max_bytes(150000):strip_icc():format(webp)/DeactivateFacebook2-56b34aa33df78cdfa004afd4.jpg)
:max_bytes(150000):strip_icc():format(webp)/DeactivateFacebook4Reasons-580714863df78cbc28cbc134.jpg)
:max_bytes(150000):strip_icc():format(webp)/DeactivateFacebook5EmailOptout-580714843df78cbc28cbbe64.jpg)


 and
and 
 ). I think this template is great for encouraging audience to vote for their favourite celebrities, foods, drinks, flavours, clothing items and so on.
 It’s that simple! No programming or technical knowledge needed!


